Best Backdrops for Photography: In-Depth Photography Backdrops Guide
In my work as a self portrait photographer, I almost always use backdrops in my photos because I love the clean, artistic look they provide.
I’ve tried a lot of different types and materials over the years, and I’ve definitely noticed that some photography backdrops are more suitable than others, for example because they are easier to clean or require no ironing.
For today’s post, I thought it would be helpful to give you an overview over the best photography backdrops for your self portrait, portrait or fine art photography.
The article is split into two parts – a quick shopping guide and a more in-depth backdrop comparison.
In the first part, you’ll find a list with all my backdrop recommendations compiled into one handy shopping guide.
If you have a bit more time, you can also read the second part where I dive into the different backdrop types and their advantages and disadvantages.
Let’s get into it!
(Just so you know: This post contains affiliate links. As an Amazon Associate I earn from qualifying purchases).
Part 1: Photography Backdrop Shopping Guide
The following section contains a summary of the best photography backdrops for your self portrait, portrait, fine art or product photography.
1) Wall mounted backdrop support systems
Here’s a list of wall mounted backdrop support systems for your home or studio:
Best Budget Choice:
Fotoconic Single Roller Wall/Light Stand Mounting 2-in-1 Manual Background Support System
This is a great budget option because it can be mounted either on the wall or on two light stands.
Best Medium Priced Choice:
NEEWER Photography 3 Roller Wall Mounting Manual Background Support System
I like this system because it gives you the option to mount three different rollers so you can easily change up your backdrop. Just make sure to buy some PVC or metal pipes to be able to mount your backdrops.
Best Deluxe Option:
Fotoconic 3 Roller Motorized Electric Wall Ceiling Mount Background Support System with Remote
This is an electric mounting system, meaning you can simply lower the backdrops using the included remote. Make sure to also buy some PVC or metal pipes to support your backdrops.
2) Free standing backdrop support systems
I personally love free standing backdrop systems, and it’s what I use in my studio.
Here are my favourite options:
Best Budget Option:
EMART Adjustable Backdrop Stand
I like this stand because it comes in different lenghts which are all adjustable, plus it includes handy spring clamps and sandbags.
Best Mid-Price Option:
Westcott Background Support System
This is a nice, sturdy upgrade option that doesn’t break the bank.
Best Deluxe Option:
Manfrotto Background Support System
This is such a lovely, heavy duty background support system - once I’m ready to upgrade mine, this is the one I’ll get!
3) Collapsible and panoramic backdrops
Here are some of my favourite collapsible and panoramic backdrops for your studio:
Best Budget Option:
NEEWER Chromakey Backdrops
These come in different colours and are perfect for portraits/headshots.
Best Medium-Priced Option:
Kate Collapsible Backdrop
I really love these because they have a gorgeous fine art design and are great for portraits.
Best Deluxe Option:
Portable Large Chromakey Green Screen Backdrop with Stand
This is ideal if you’re photographing groups of people, plus the green screen can easily be changed to any colour in Photoshop.
2) Backdrops
In the next section, I’ve compiled some different backdrop options.
My overall favourite backdrop brand for my fine art self portraits is Kate Backdrop.
I just love their products - they have a huge selection in general, and they also do a lot of beautiful art backdrops that look like painted canvases.
You can shop their products directly on their website HERE.
Best for fine art/portrait photography
Kate Backdrops
As mentioned, these are my favourite backdrops because they are made from light materials, plus the brand offers loads of different artistic, painterly designs.
Best Canvas Backdrop
Westcott X-Drop Canvas Backdrop
I really love these because they are made from sturdy canvas, plus the brand offers lots of artistic designs.
Best seamless paper backdrop (comes in rolls)
Savage Seamless Background Paper
I like Savage paper backdrops because they are available in a whole lot of colours and different lengths.
Best Backdrop for Product/Food Photography
PVC Backdrop
These are great because you can easily wipe or clean them! They are available in a smaller size, which makes them perfect for product or food photography.
Green Screen Backdrop
Green Screen Backdrop
Simple green screen backdrop option made from muslin, available in different sizes.
Part 2: Backdrops for Photography: an in-depth guide
When it comes to backdrops, you actually have quite a few different options.
In the following sections, I will share the most common types of:
backdrop stands/mounting systems
backdrop materials
I will also list the advantages and disadvantages of each category so you can make an informed decision when shopping for your photography backdrop 😊
1) Backdrop stands and mounting systems
Let’s first look at the different types of backdrop stands and mounting systems.
Overall, there are four main types of backdrop systems to choose from:
Wall- or ceiling mounted
Free standing support system
Panoramic backdrop
Foldable/collapsible backdrop
Read about the features, advantages and disadvantages of each type in the following sections.
1) Wall- or ceiling mounted
This type of backdrop system is often found in professional photography studios, but you can also easily mount such a system in your home.
The way it works is that you attach one or several metal or plastic rollers with rolled up backdrops on your wall or ceiling.
As soon as you need to use the backdrop, you simply lower the material using either a manual system (cheaper) or an electrical system (more pricey).
Here’s a picture of a wall mounted backdrop system:
Advantages
Saves space:
The main advantage of these kind of backdrop systems is that they save a lot of space! You can store the backdrop neatly rolled up and only lower it when you need it.
Keeps backdrop clean and crease-free
Another huge advantage of roller systems is that the backdrop doesn’t crease during storage because it’s rolled up. That also means it doesn’t get dirty as easily as other backdrops that can gather dust or get stained during storage.
Doesn’t require assembly and disassembly
I personally love ceiling or wall mounted backdrop systems because they only have to be installed once and can then be used whenever needed.
In my home studio, I currently use a backdrop support system, and it’s a little annoying because I constantly have to set it up and then tidy it away again. It would be much easier to install a ceiling or wall system once and then just raise the backdrop when not in use.
Disadvantages
The first disadvantage is that this kind of system requires a proper installation when you first set it up. If you’re not a DIY person, you may need someone to help you mounting the rails on the wall or ceiling.
Can’t be moved once installed
Another disadvantage of these backdrop systems is that you can’t move them around once they’re installed (as opposed to a free-standing backdrop), which makes them less flexible.
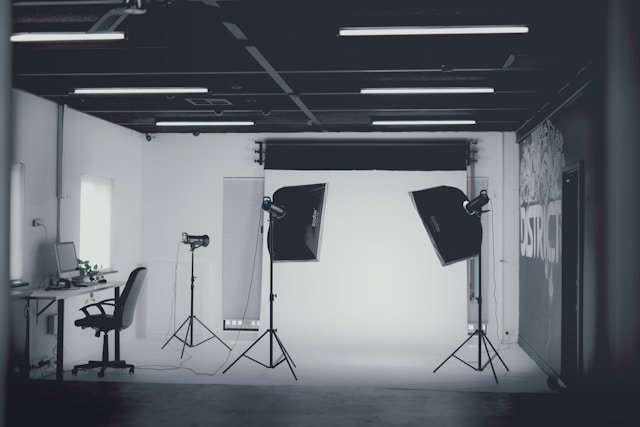
2) Free standing support system
Let’s talk about the next backdrop type: backdrops mounted on a free standing support system.
This sounds way more complicated than what it actually is - a metal crossbar placed on two tripod stands.
Here’s a photo:

The metal bar that carries the backdrop may be fixed length or extendable (telescopic) - the latter is of course handier because you can adjust the support system depending on your home or studio space.
This is the kind of backdrop system I’m currently using in my home studio.
Advantages
Flexibility
The first big advantage of free standing support systems is that they’re so flexible - you can set them up wherever you want, carry them to different locations, etc.
Plus, if you buy a system with a telescopic crossbar, you can extend the length and adapt it to your space.
No installation required
The next advantage is that this kind of system requires no installation - you simply set it up and dismantle after use.
Disadvantages
Less stable
Depending on the quality of your background support system, this type of backdrop stand can be a little flimsy - I’ve had mine topple over a few times because the tripod stands aren’t the best quality. Also, someone could knock them over - since the system is not mounted to anything, it’s not as stable.
More hassle
My big gripe with these kind of stands is that they have to be assembled and disassembled for every use if you use them in a home studio.
In a professional studio, you can of course simply leave them set up.
However, if you use this system in a home studio, it does take up way more space than a wall- or ceiling mounted system, and so you probably need to disassemble it after every shoot and store it out of the way.
3) Panoramic backdrop stand
The next backdrop option is a panoramic backdrop system. These usually combine a metal frame with a three panel backdrop - you can see one here.
Advantages:
Flexibility
The main advantage is that these backdrop stands are flexible - you can set them up wherever you want, carry them to different locations, etc.
Large surface area
Since these backdrop stands consist of several panels, they are often wider than other backdrops, meaning they’re great for photographing groups or simply creating a more spacious set.
Disadvantages
Higher price point
This type of backdrop system can be more expensive than the standard free standing ones, so they can be a bit of an investment.
Takes up more space
Unless you assemble and disassemble the backdrop every time, which is a bit of a hassle, these kind of backdrops take up quite a bit of space and may not be suitable for a small home studio.
4) Foldable/collapsible backdrop
Finally, you have the option of buying a foldable/collapsible backdrop. They’re often double sided and may have loops for hanging them up (otherwise you can lean them against something or have an assistant hold them).
Advantages
Portability
The first advantages of collapsible backdrops is that they’re portable: You can simply collapse them and carry them with you wherever you want, which makes them great for shoots outside and on location.
Disadvantages
No mounting system
These types of backdrops don’t come with an integrated mounting system, so you either have to lean them against something, have an assistant hold them or use the attached loops to hang them up.
Small surface area
Another disadvantage is their small surface area. They’re great for things like headshots, but if you want to do a full body shot with some space around the model, you may be in trouble.
Design limitations
The last disadvantage of these backdrops is that you’re limited in terms of design - with a roller mounted system for example, you can buy all kinds of different rolled up backdrops and mount them. With these collapsible backdrops, you get one design per backdrop, so if you want other designs, you have to buy a whole new one each time.
Now that we’ve looked at the different backdrop stands and mounting systems, let’s move on to the different backdrop types and materials!
2) Backdrop types/materials
Types of backdrop
First of all: you can get backdrops in the shape of:
a roll (can be used either for wall-/ceiling-mounted or for free standing backdrop supports)
a single sheet (usually attached with clamps to your backdrop support system)
a rigid board, usually made from PVC (can be leaned against something or used for flatlays, making it the ideal choice for product photography backdrops)
Which one of those you choose depends on your backdrop support system and your general preference.
I personally use sheet type backdrops because I can easily clamp them to my free-standing support system. However, long term I’m planning to upgrade to a wall mounted backdrop system with rolled-up backdrops because it will be easier to keep the backdrop clean and crease-free.
Backdrop Materials
There are many different backdrop materials available. Here are some of the most common:
Seamless Paper Backdrops
Seamless paper is a great choice for the studio because it has a very smooth surface and is available in a wide range of colours.
It’s easy to set up and can be easily replaced when it gets dirty or damaged.
Muslin Backdrops
Muslin backdrops are made from a durable material (mostly cotton) that is often hand-painted or dyed in various patterns and designs.
They provide a soft, textured look that adds depth to photos.
Vinyl Backdrops
Vinyl backdrops are great for outdoor shoots or events where the backdrop may need to withstand rain or wind.
They come in a variety of colours and patterns.
Canvas Backdrops
Canvas backdrops offer a more traditional look with their textured surface and matte finish. They are great for fine art portrait/self portrait photography.
Green Screen Backdrops
Green screen backdrops allow you to digitally insert any background you desire during post-processing using chroma key technology.
Custom Printed Backdrops
If you’re looking for a particular type of backdrop, but can’t find it in the shops, you can order a custom printed backdrop for your shoot.
DIY backdrops
Of course, you always have the option of creating your own backdrop - I’ve done this in the past by painting a matte foamboard with acrylic paint. This is a great option if you’re looking to achieve a painterly effect in your photo.
Extra tip for using backdrops:
Ideally, try to buy backdrops that don’t crease (like seamless paper that you can roll up, or special crease-free microfibre backdrops).
If that’s not possible, make sure to iron your backdrop before the shoot - it’s really worth the effort as removing creases in Photoshop is a real pain!
And that’s it! If you liked this article, make sure to subscribe below so you never miss a post!